Visualize Json Responses in PostMan as a Table 💻

I am Dharaneeshwar, a software developer who can build WebApps. I write tech articles that are educative. I occasionally make videos.
Did you know that you can visualize Json Responses in postman?
Let me show you how to get your Json Response as a table.
The motivation for this article came when I was working on a task during my internship. The other day, I was trying to use elastic search and filter the hits I get using Lucene query, which is a rich query language supported by Elastic Search. If I sound unnecessarily complicated, I was just trying to filter the response array.
The response was more complicated than what is needed for simple testing. So a table did the job fine.
We will first look at how to visualize a simple response, then let's take a look at the response from Elastic Search.
If you want to see how this is done in action, here is my video regarding the same.
Postman - If you didn't know
Postman is a scalable API testing tool, which is a go-to for most developers. We all know that we can use postman to quickly test an API endpoint with multiple parameters. We usually get the response in JSON format.
But you can do better.
Write tests for your request.
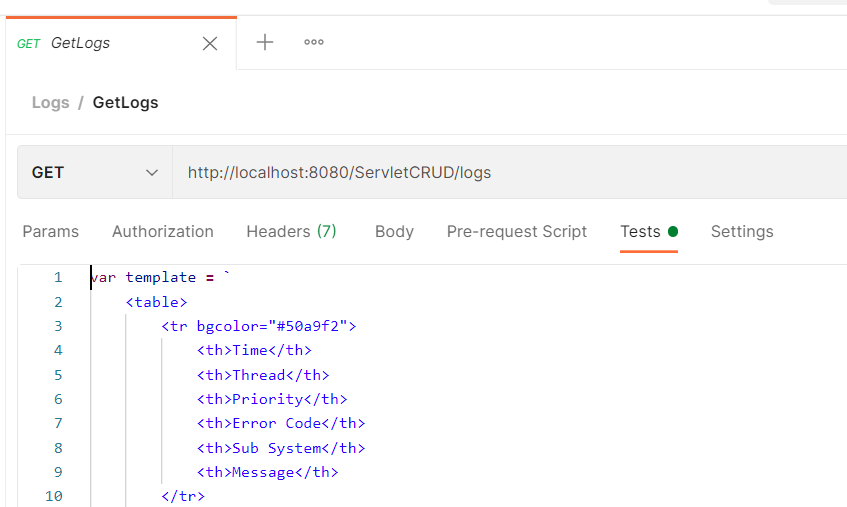
Open Postman and send a request to an API endpoint of your choice and look for the response. You get the expected response, Right? Now, open the tests tab. Here is where all magic happens.
Let's start with this snippet of code.
pm.visualizer.set(template, {
    response: pm.response.json()
});
Here, pm stands for Postman. Then we are calling a method visualizer.set() with 2 parameters. One is the template, and another one is the response. We can access the response by using pm.response.json().
We have access to the variable response in the variable template. The variable template uses the syntax of Handlebar which is a simple templating language. We are now initializing a variable template to store all the handlebar code that we need. It is just HTML on steroids.
Let's write the template now.
var template = `
    <table>
        <tr bgcolor="#50a9f2">
            <th>Time</th>
            <th>Thread</th>
            <th>Priority</th>
            <th>Error Code</th>
            <th>Sub System</th>
            <th>Message</th>
        </tr>
        {{#each response}}
            <tr>
                <td>{{time}}</td>
                <td>{{thread}}</td>
                <td>{{priority}}</td>
                <td>{{err_code}}</td>
                <td>{{subsystem}}</td>
                <td>{{message}}</td>
            </tr>
        {{/each}}
    </table>
`;
I have some styling at the top. Then we are using each loop to iterate through the response object. Getting the data from the object is a cakewalk. We can directly use the parameter name inside of double flower braces {{<parameter here>}}.
The Complete Code
var template = `
    <table>
        <tr bgcolor="#50a9f2">
            <th>Time</th>
            <th>Thread</th>
            <th>Priority</th>
            <th>Error Code</th>
            <th>Sub System</th>
            <th>Message</th>
        </tr>

        {{#each response}}
            <tr>
                <td>{{time}}</td>
                <td>{{thread}}</td>
                <td>{{priority}}</td>
                <td>{{err_code}}</td>
                <td>{{subsystem}}</td>
                <td>{{message}}</td>
            </tr>
        {{/each}}
    </table>
`;
pm.visualizer.set(template, {
    response: pm.response.json()
});
Copy this code snippet and paste it into the
teststab of the request. Now, send a request to the API.
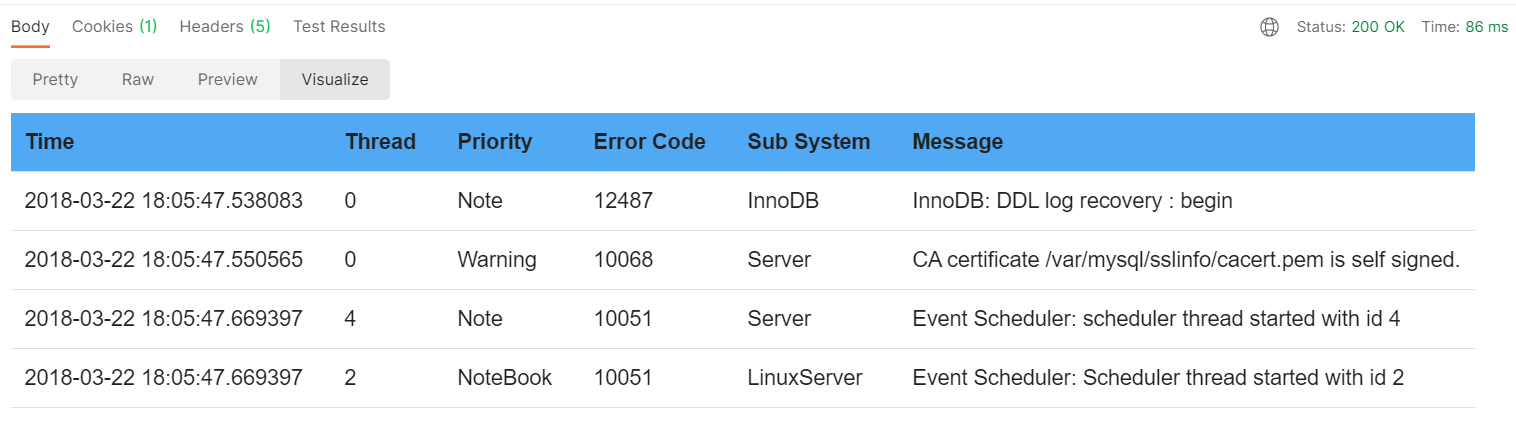
We will have the response in the table format in the Visualize tab.
Hurrah! We did it.🎉🎉🎉
By the way, if you like short and crisp tutorials like this one, consider following my blog and subscribe to my newsletter here.
Let's get to Elastic Search now
I was talking about elastic search right? Let’s take a look at that.
This is the response from the ElasticSearch I was talking about.
{
    "took": 4,
    "timed_out": false,
    "_shards": {
        "total": 5,
        "successful": 5,
        "skipped": 0,
        "failed": 0
    },
    "hits": {
        "total": {
            "value": 4,
            "relation": "eq"
        },
        "max_score": 1.0,
        "hits": [
            {
                "_index": "log",
                "_type": "_doc",
                "_id": "bOXmankBn2C2LgfG4FY8",
                "_score": 1.0,
                "_source": {
                    "err_code": "12487",
                    "subsystem": "InnoDB",
                    "time": "2018-03-22 18:05:47.538083",
                    "thread": "0",
                    "priority": "Note",
                    "message": "InnoDB: DDL log recovery : begin"
                }
            },
            // ... more hits here

            }
        ]
    }
}
As you can see, the response is comparatively complicated.
We only need the array of objects from the response object. Let's take a look at how to do that.
- The first change that we need to do is with the
responsevariable.
pm.visualizer.set(template, {
    response: pm.response.json().hits.hits
});
We are accessing the actual hits array in the response we get using json().hits.hits.
- The next change is with
eachloop. It's easier to have another variable item to access them within the loop.
{{#each response as |item|}}
- The final change is the way we get the data from the object. We use
{{item._source.<parameter>}}
<td>{{item._source.thread}}</td>
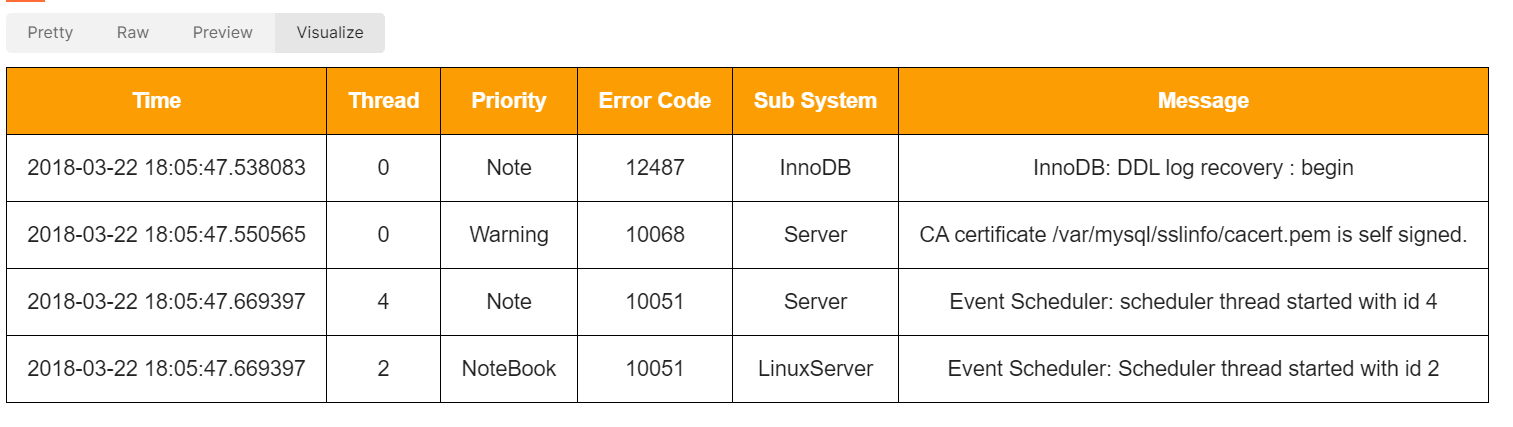
The Complete Template code for the response from Elastic Search.
var template = `
    <style>
    td, th {text-align: center; padding:15px;}
    table, th, td {
        border: 1px solid black;
    }
    </style>
    <table>
        <tr bgcolor="#fc9d03" style="color:#fff;">
            <th>Time</th>
            <th>Thread</th>
            <th>Priority</th>
            <th>Error Code</th>
            <th>Sub System</th>
            <th>Message</th>
        </tr>

        {{#each response as |item|}}
            <tr>
                <td style="padding-left:15px">{{item._source.time}}</td>
                <td>{{item._source.thread}}</td>
                <td>{{item._source.priority}}</td>
                <td>{{item._source.err_code}}</td>
                <td>{{item._source.subsystem}}</td>
                <td style="padding-right:15px">{{item._source.message}}</td>
            </tr>
        {{/each}}
    </table>
`;
pm.visualizer.set(template, {
    response: pm.response.json().hits.hits
});
Now, this snippet has to go to the
teststab of your request to Elastic Search.
That's it we have got the data from the Elastic Search in the form of a beautiful table.
And, that’s it for this article. Feel Free to check my previous article where I talk about what language a beginner should learn.


